Cost Module
To better allow you to work with "What-if" costing scenarios during the field layout you now have a dedicated "Cost" module for Field Activity Planner. The module is comprised of two new dashboard tabs namely "Cost Equipment" and "Cost Operations".
Cost Equipment
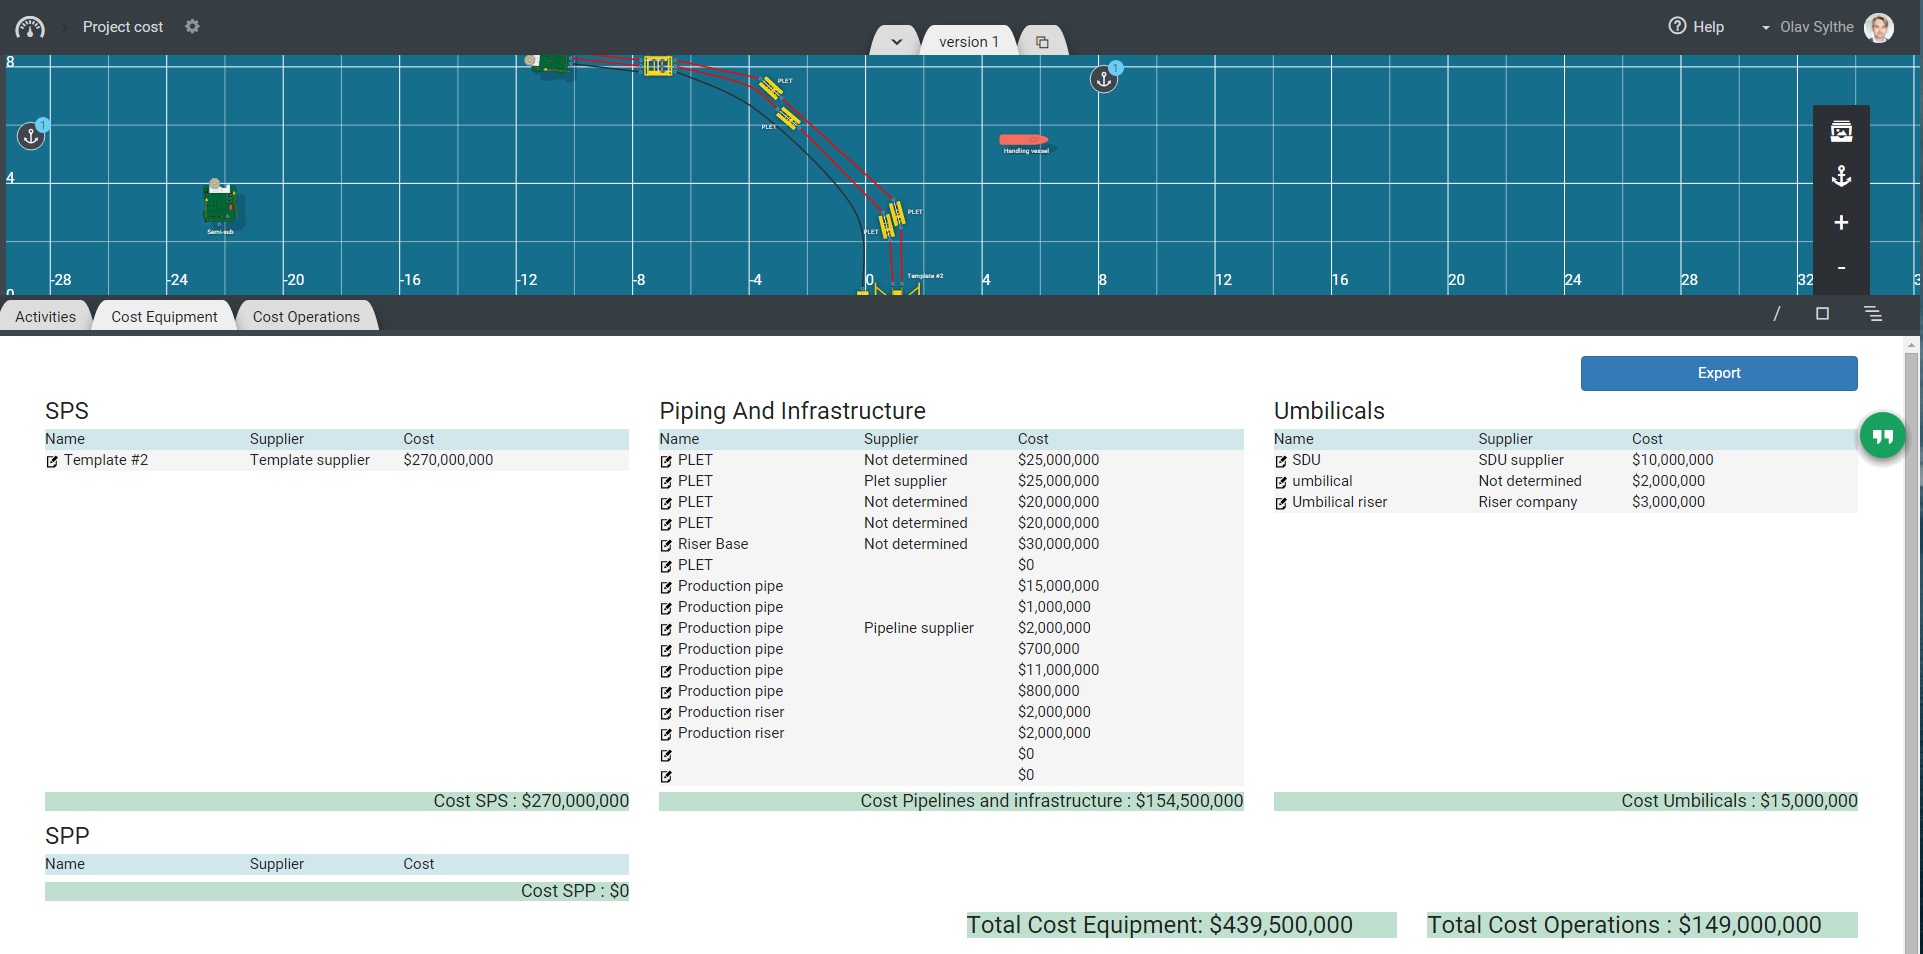
Simply click on the "Cost Equipment" tab next to the "Activities" tab to see the "Equipment Cost" overview. As you design a new field layout this tab will automatically be itemized and summarized into the following subgroups; "SPS", "SPP", "Piping and Infrastructure", and "Umbilicals".
Cost Operations
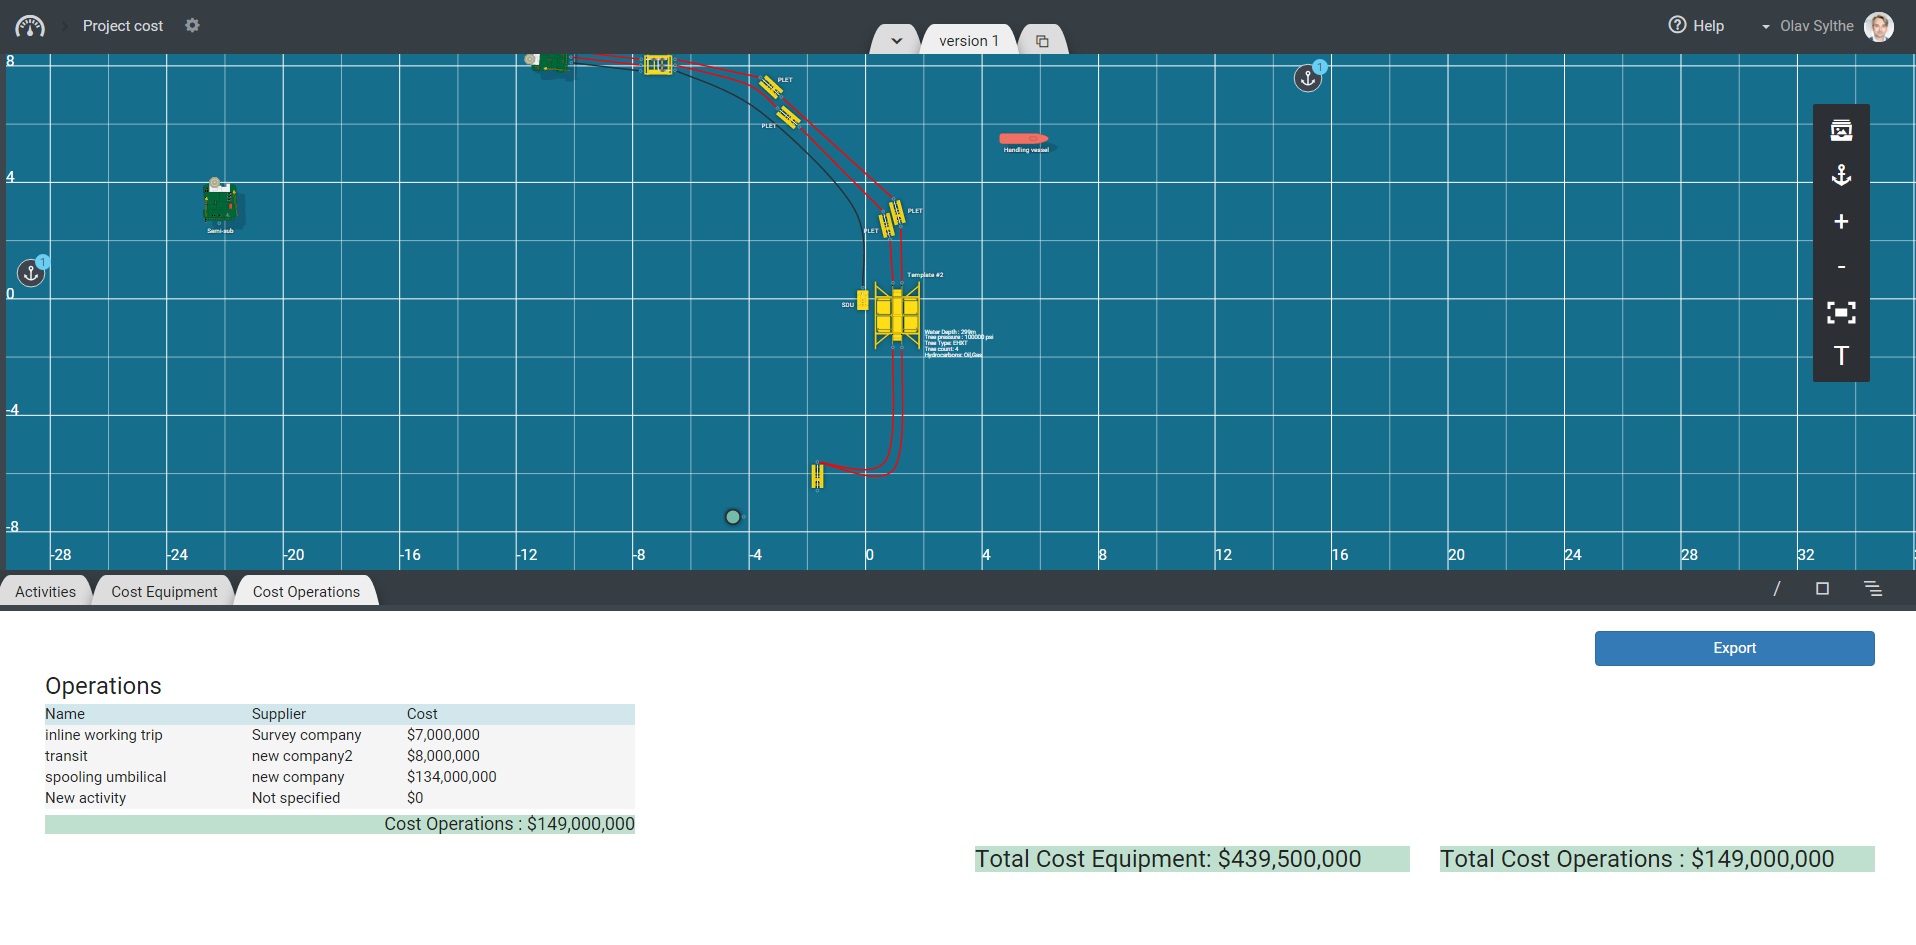
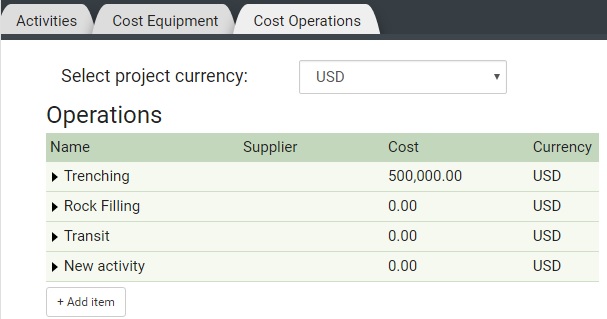
The "Cost Operations" dashboard tab performs the same function and will itemize and summarize all activity costs for the project and also show you the details as shown here:
Selecting a Project Currency
The "Project Currency" drop down list allows you to select the specific currency you want to use for the project cost summation or Total Cost for both Equipment or Operations. See the illustration below for an example.
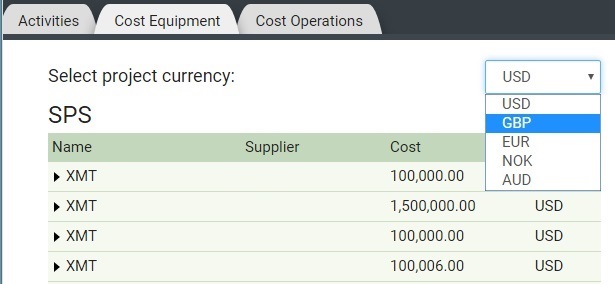
Project Currencies can be changed in the Project Settings.
Assigning Asset Costs and Supplier
When designing a field layout the "Cost Equipment" tab will automatically be itemized and summarized based on the corporate account settings for default asset cost. To change the cost for an asset in the current project there is two ways to do this.
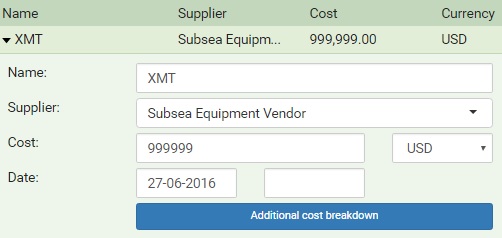
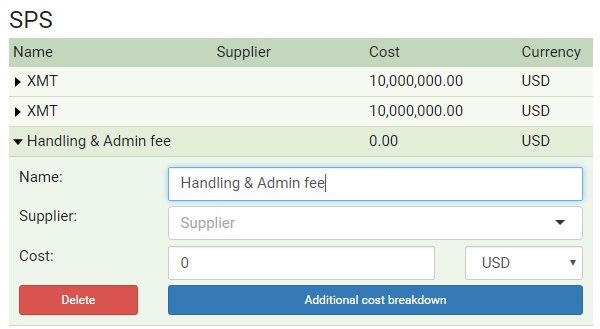
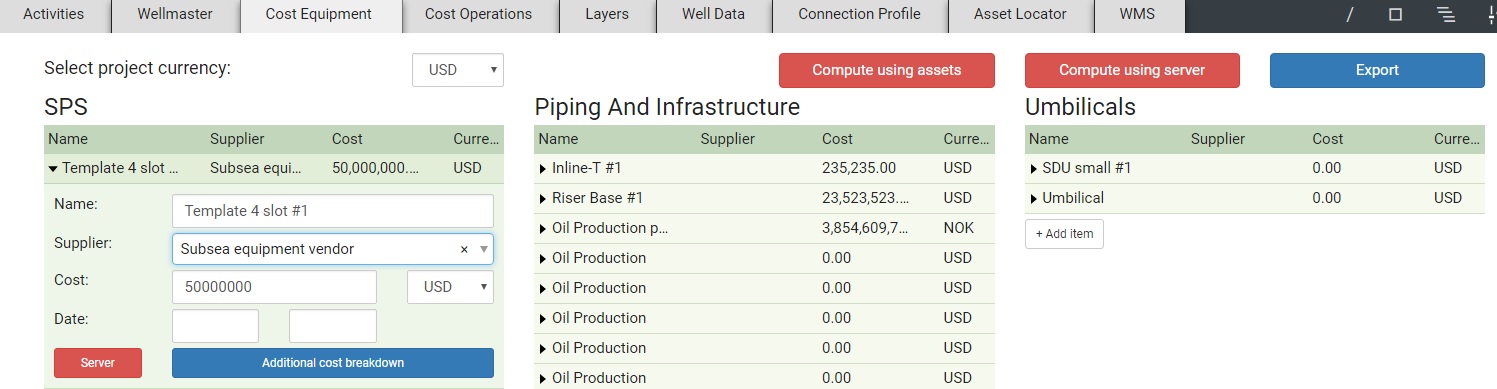
You can simply click on the asset in the layout screen that you wish to specify cost on, and the corresponding entry in the "Cost Equipment" tab will be expanded as shown in the illustration below:
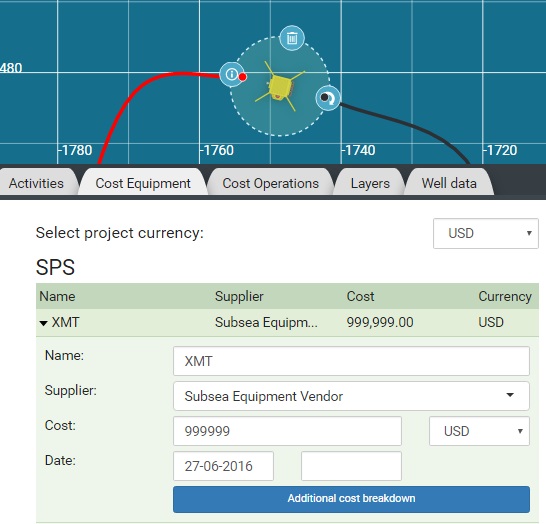
The expanded cost section for the selected asset will display the fields "Name", "Supplier", "Cost, "Currency", and finally a "Additional cost breakdown" button.
The Name field will display the default or current name of the selected asset. You can change it directly in the Name edit field.
To define a supplier or vendor for the subsea asset or vessel, simply start typing in the name in the "Supplier" field. If the supplier is not already defined in the database you will see a line with the option to Add the new supplier appear below the edit field as shown here.
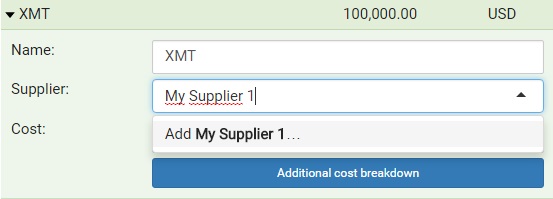
Simply select it and the supplier will now be defined for the project and is available for selection in the "Supplier field for all other assets in the current project.
To define the asset cost, simply assign a value in the Costs field.
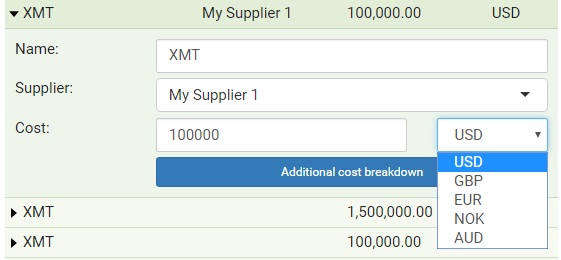
To set the currency for that specific asset, simply select the desired currency from the drop down list as shown below:
You can also specify a date and/or date range for the asset cost. This information will then be exported out to MS Excel if you use the Export function and can be useful when you work with CAPEX/OPEX calculations outside of Field Activity Planner.
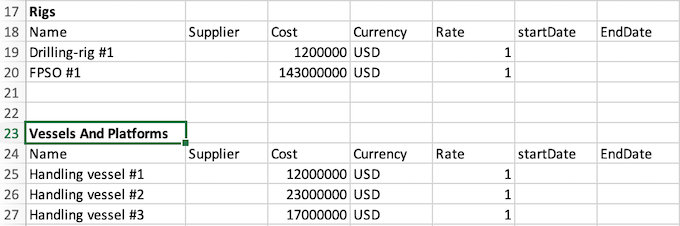
Rigs and Vessels and Platform cost
Costs assigned to Rigs, Vessels and Platforms will now appear in separate sections in the “Cost Equipment” tab as shown below:

They will also appear as a separate section if you use the “Export” button in the “Cost Equipment” tab, or the “Export” button in the “Asset Locator” that will save all costs to a MS Excel spreadsheet.
Additional cost breakdown
You also have the possibility to break down asset cost into itemized parts and assigning individual cost for each sub part. To do this simply click on the "Additional cost breakdown" button. This will display the dialog for assigning "Cost" for individual parts as shown below:
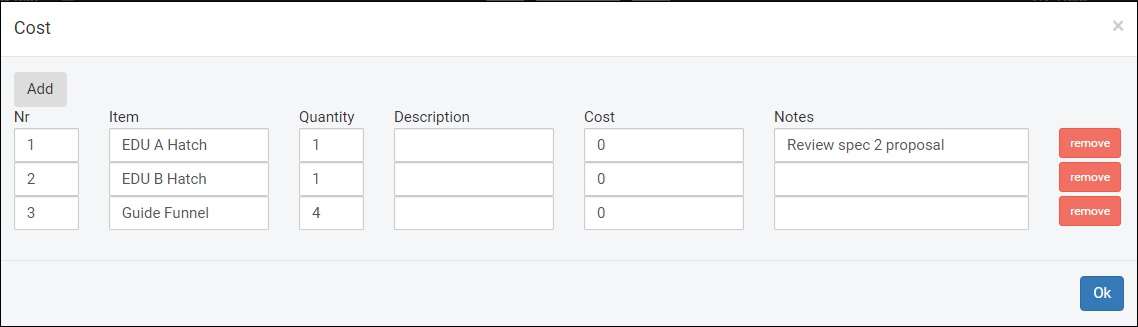
To assign cost for an individual part, simply click on the "Add" button to add a new line for each part that you wish to assign the cost for. You can add information in each of the following separate fields; Nr, Item, Quantity, Description, Cost, and finally Notes.
To delete an item from the list, simply click on the Remove button to the right of the "Notes" field. When you are done, click on "Ok" to accept the entries made. To exit, click on the "X" icon on the top most right corner of the dialog.
Edit directly in the Cost Tab
You can of course freely edit any cost entry in either the "Cost Equipment" or the "Cost Operations" tab without selecting an asset first. Simply navigate to the cost entry line you wish to change and click on it. It will then automatically expand and reveal the edit section as described above. And on the layout screen the corresponding asset will also be highlighted.
Unit Cost for Connections
If you use real world scale in the stage settings and have defined the sea bed depth or loaded bathymetry data that defines the sea bed we automatically calculate the length of all connections in both 2D and 3D. This also allows you now to assign a cost per unit (meters) that will automatically update in the cost module when a connection is edited.
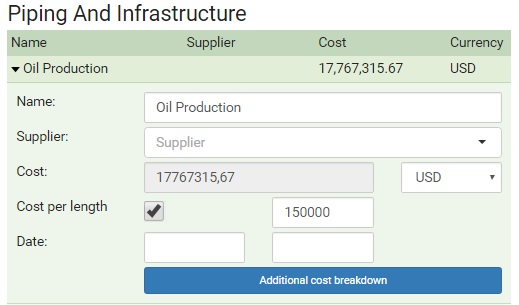
To enable this, check the Cost per length checkbox and enter a cost per unit (meter) in the input field to the right. The "Cost" field above will then be greyed out and display the calculated total cost for the connection automatically.
Entering a Custom Cost Line entry
To make it easy to add generic or custom cost items not related specifically to assets, connections, or activities in the Cost Equipment or Cost Operations tabs we have created an "+Add item" button. This will allow you to add custom cost for e.g. "Admin overhead" etc.
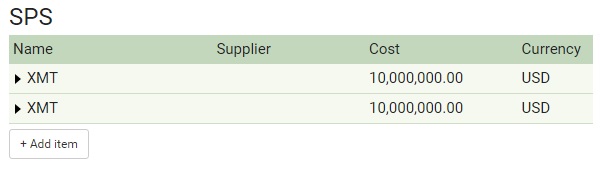
Clicking on the "+Add item" button, will reveal a new custom cost line entry not linked to an asset or activity as shown here:
Assigning Activity Costs and Supplier
You can now assign a cost value and a supplier for all activities or operations that you define for a field layout, and as you add field activities to the "Activity" tab the "Cost Operations" tab will automatically be summarized.
To set cost/supplier/currency for an activity select the "Cost Operations" tab and you will see a list of all the activities that are defined so far.
To add or edit the cost for an activity simply click on the desired activity line entry e.g. "Trenching" in this case, and it will then automatically expand and reveal the edit section. And if an asset or vessel has been assigned to the activity it will also be highlighted on the layout screen.
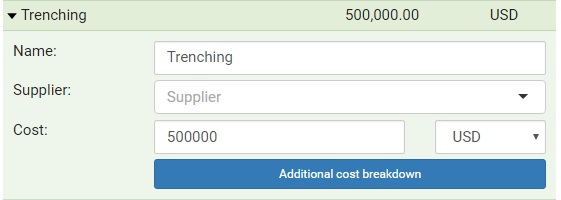
The Name, Supplier, Cost, Currency fields and the Additional cost breakdown button have the exact same functionality as described for the for the Assigning Equipment Costs and Supplier section described in this documentation.
Cost Server Integration
Starting with version 1.5, it is possible to develop your own integration based on our cost server computation module. This allows you to integrate with your own proprietary back-end cost computation/calculation systems that will receive queries from FieldAp to compute very accurate and up to date costing. From the user point of view, a button appears on the UI named "Compute using server" if the costs server module is enabled, that allows the user to launch a computation using your own integrated cost server.
With the cost server module enabled, you will now see the following two (2) buttons named Compute using assets and Compute using server. The first will calculate costs based on the given asset cost definitions in Field Activity Planner as you are used to. The latter will do the calculations using your integration with the cost server module for more detailed in house costing data based on your integration. You will also find a Server button on the detailed cost item view for each entry. Pressing this button will then just recalculate that individual item using the cost server Integration. The cost server configuration settings can be found under Modules in the Account Settings.
For more information on the Cost Server, please see the API docs, or contact us.
Export to Microsoft Excel
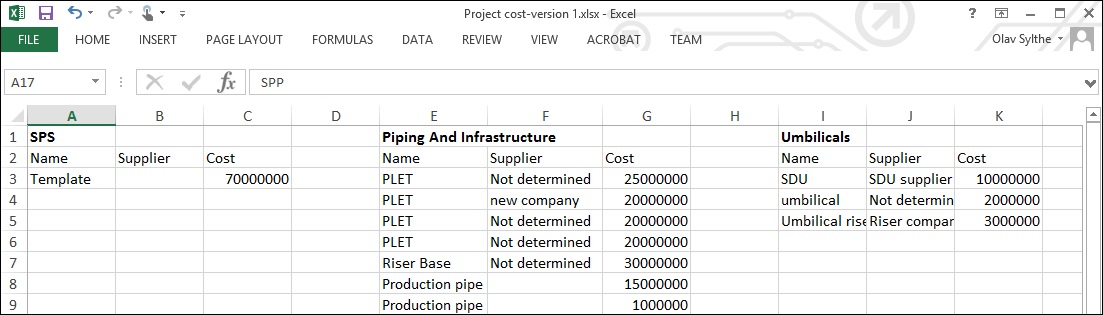
You can export the cost data for your field layout project out to a Microsoft Excel file for further editing by clicking on the "Export" button located in the topmost right corner for both the tabs.

When opening the exported file in Microsoft Excel you will find two tabs named Cost Equipment and Cost Operations that contains all the cost information from your project.
Excel grouping for sub cost
When specifying cost for an asset, connection or an activity you have the option to specify additional cost details e.g. sub-costs as described here Additional cost breakdown
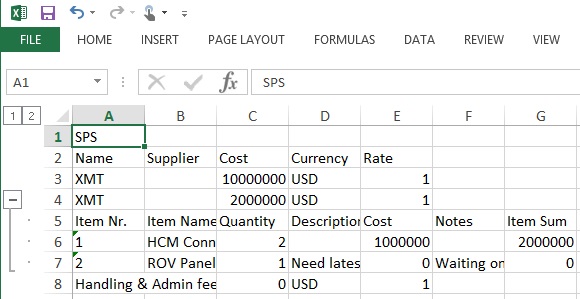
When you select "Export" and open the exported file in Microsoft Excel you will now have all "Cost breakdowns" or "Sub costs" if you will available to you as grouped outlines. To see them simply click on the "+" symbol as shown here:
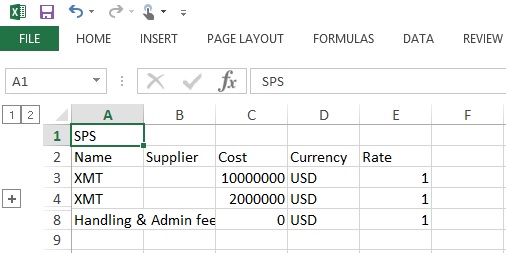
The following illustration shows the expanded grouped costs: